The Firewall is an essential security tool that allows you to control and filter incoming and outgoing traffic on your virtual server. Configuring custom rules protects your VPS against unauthorized access and mitigates potential cyberattacks.
1. Log in to your control panel using the access credentials previously sent to your email.
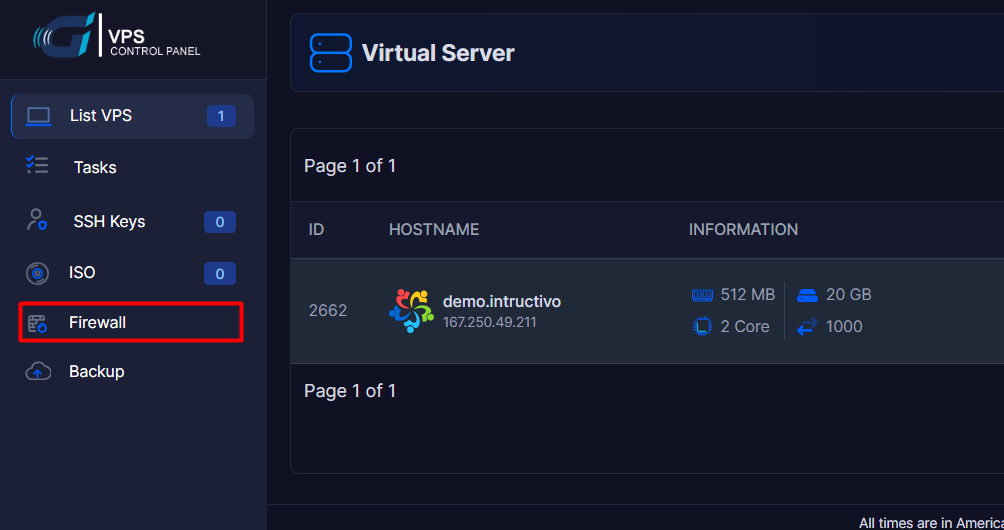
2. Go to the left sidebar menu, locate the Firewall section, and click on it.
3. Select the Add Firewall Plan option.
4. Fill out the general settings for the security profile:
4.1. Plan name: Enter a descriptive identifier for this security profile (for example: Web-Security or SSH-Lockdown)
4.2. Default Policy: Select the general behavior of the Firewall for traffic that does not match any specific rule. It is highly recommended to use DROP (Discard/Block everything) for strict security.
4.3. Note: Add a brief description regarding the purpose of this plan if you consider it necessary.

5. Configure individual traffic rules (Critical Step):
5.1. Direction: Choose between IN (Incoming traffic toward your VPS) or OUT (Outgoing traffic from your VPS).
5.2. IP Type: Select the corresponding network protocol, either IPv4 or IPv6.
5.3. Decision: Determine whether the rule will ACCEPT (Allow) or DROP (Block) the specified traffic.
5.4. Protocol: Select the required transport protocol (such as TCP, UDP, or ICMP).
5.5. Port: Indicate the port number or range of ports to which the rule will apply (for example: 22 for SSH, 80 for HTTP, or 443 for HTTPS).
5.6. IP: Type the IP address or network range (in CIDR format, e.g., 192.168.1.1/32) that the rule will affect. Leave 0.0.0.0/0 if you want to apply the rule to the entire Internet.

5.7. Click the blue "Add" button on the far right of the row to add the rule to the table below.
6. Once all your rules are structured, click the blue "Save" button in the bottom left corner to consolidate and activate the Firewall plan on your VPS:
Examples:
1. To enable a Web Server (HTTP and HTTPS pages): If you host websites, you must allow everyone to access them through standard browsing ports.
1.1. Rule 1 (HTTP): Direction: IN | Decision: ACCEPT | Protocol: TCP | Port: 80 | IP: 0.0.0.0/0
1.2. Rule 2 (HTTPS): Direction: IN | Decision: ACCEPT | Protocol: TCP | Port: 443 | IP: 0.0.0.0/0
2.2. To enable Secure Remote Access (SSH for Linux / RDP for Windows): Security recommendation: If you have a static IP address at your home or office, replace 0.0.0.0/0 with your specific IP so that only you can attempt to connect to the server.
2.2. SSH Access (Linux): Direction: IN | Decision: ACCEPT | Protocol: TCP | Port: 22 | IP: 0.0.0.0/0 (or your private IP).
2.3. Remote Desktop Access (Windows): Direction: IN | Decision: ACCEPT | Protocol: TCP | Port: 3389 | IP: 0.0.0.0/0 (or your private IP).
Security Notes.
• If you configure the Default Policy to DROP (Block everything), ensure you first add the SSH (Port 22) or RDP (Port 3389) rule before saving changes. Otherwise, you will immediately lose remote connection to your VPS.
• Keeping a default policy on ACCEPT exposes all internal ports of your VPS to the internet, relying entirely on system passwords for safety and drastically increasing the vulnerability surface to port scanning attacks.
• Before clicking the "Save" button to activate a restrictive plan, thoroughly verify that explicit incoming (IN) rules exist for your server's management port (Port 22 for SSH on Linux or Port 3389 for RDP on Windows).
